Custom 3D Embroidery Logo on Hats: Step-by-Step Cap Embroidery Process
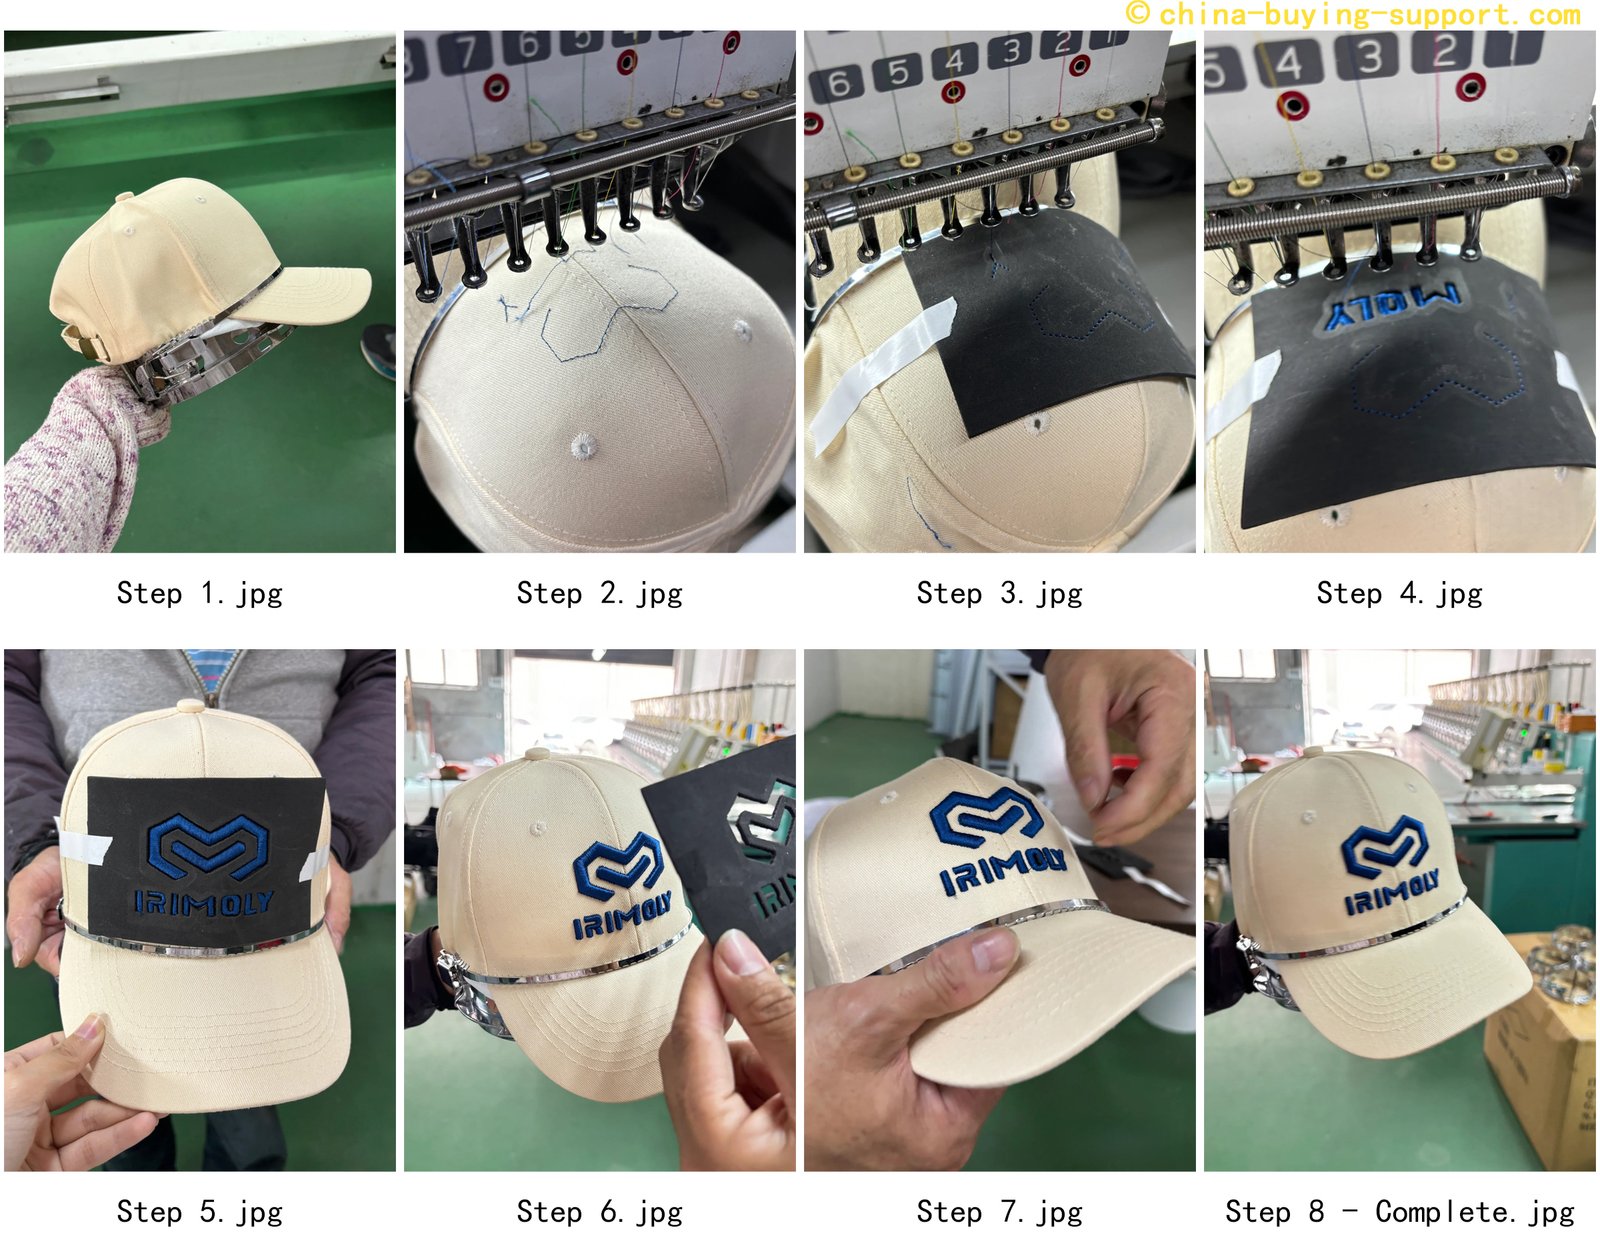
This image illustrates the step-by-step process of creating a striking 3D puff embroidered logo on a baseball cap. Starting from the initial hooping and stitching of a placement outline, the image progresses through the application of specialized 3D foam, the precise embroidery of the logo with a high-density satin stitch, the careful removal (weeding) of excess foam, and finally showcases the finished, raised logo. This visual guide highlights the detailed craftsmanship involved in achieving a premium, three-dimensional embroidered effect.
If you’ve ever picked up a custom baseball cap and felt that bold, raised logo that really pops, you’ve already met one of the most popular hat branding techniques: 3D Embroidery (3D Puff Embroidery).
It looks simple when it’s finished, but the clean “lift” and sharp edges come from a very specific production flow. Below is the real-world step-by-step process we use in the factory to turn a plain cap into a crisp, professional 3D embroidered hat.
Step 1: Hooping the Cap (Setting Up the Cap Frame)
First, we mount the cap onto a cap driver + cap frame. Think of it like locking the hat into a stable “holder” so it doesn’t move during stitching.
- The metal ring grips the bill and crown
- The fabric stays smooth across the front panels
- We line up the center seam with the machine’s center point so the logo stays perfectly straight
This setup is a big deal for cap embroidery, because caps are curved and seams can easily pull the design off-center if they’re not held tight.
Step 2: Placement Check (Quick Trace Stitch)
Before we start the real embroidery, we run a placement stitch (also called a trace stitch) on the crown.
This is basically a light outline that helps us confirm:
- the logo position is correct
- the size looks right on the hat
- the design won’t drift over the seam or hit the brim
It’s a quick step, but it prevents the most common mistake in custom hats: “the logo is slightly crooked”.
Step 3: Adding the Foam (Preparing for 3D Puff Embroidery)
Now for the magic part — puff foam.
To get that raised effect, we place a piece of foam (usually 2–3 mm EVA foam) right over the placement outline, then tape it down gently at the edges.
This foam is what gives 3D Puff Embroidery its signature height and shape. Without foam, the embroidery would look flat like standard stitching.
Step 4: Tack-Down / Perforation (Locking the Foam in Place)
Next, we run a short tack-down / perforation sequence.
These tiny stitches do two things:
- Punch through the foam cleanly
- Hold it steady so it won’t shift while stitching
This step matters a lot because foam can lift or slide if it’s not controlled, especially on curved hat fronts.
Step 5: Stitching the Raised Logo (Building the 3D Structure)
Here’s where the logo comes to life.
We stitch dense columns over the foam to create the raised look. In most cases, this is done with satin columns (industry standard for clean 3D lettering and outlines).
To keep the 3D embroidery sharp and durable, we dial in a few key settings:
- correct stitch density
- proper column width (so it covers the foam edge-to-edge)
- strong capping stitches (to “wrap” the foam neatly)
- We fine-tune the tension and needle depth so the stitching stays stable when crossing the center seam.
On hats, especially structured caps, the front seam is always a challenge. Good machine setup + correct stitch order is what keeps everything smooth, even when crossing that seam.
Quick note: What’s a satin column?
A satin column is a smooth embroidery stitch used for text, borders, and narrow shapes. It’s made from long stitches running back and forth in a tight zigzag, which gives it that clean, glossy look.
Compared to a fill stitch (tatami), satin columns look sharper and stand taller — perfect for 3D puff embroidery logos.
Step 6: Removing the Extra Foam
After the embroidery finishes, we remove the excess foam by hand.
Because we perforated it earlier, the foam tears away cleanly around the stitched edges. This is one of those “satisfying” moments in production — the logo instantly looks crisp and raised.
Step 7: Cleanup + Detail Work (Quality Control)
Embroidery machines are powerful, but the final look still depends on skilled hands.
The QC team will:
- pull away tiny foam bits stuck under stitches
- trim loose jump threads
- clean up edges for a neat outline
- check the logo surface for thread breaks or uneven coverage
For premium custom embroidered hats, this step is what separates “good” from “wow”.
Step 8: Final Inspection (Finish & Pack)
Last step: we take the cap off the frame and do a final finishing check.
This includes:
- brushing and cleaning the embroidery surface
- trimming any remaining threads
- checking alignment (centered + level)
- confirming edge coverage and stitch tightness
The end result is a structured cap with a bold, raised logo that feels solid, looks clean, and holds up well for daily wear.
Why 3D Puff Embroidery Is So Popular for Custom Hats
When you want a logo that stands out — especially on baseball caps, trucker hats, and snapbacks — 3D Embroidery (3D Puff Embroidery) is one of the best choices.
It gives you:
- a premium “raised” finish
- strong brand visibility from a distance
- a clean, sporty look that works for streetwear and company swag
- great durability when stitched properly
** We’ve put together 12 FAQs about 3D puff embroidery. If you’re interested, feel free to click <FAQ: 3D Puff Embroidery Logo on Hats> to read the full details.
If you have any questions about hats / caps customization, or if you’d like professional assistance to make your buying process easier, we’re here for you. Feel free to reach out – whether you need a trustworthy agent on the ground, guidance on shipping options, or just someone to talk through your product ideas with, we’re happy to help. Contact us anytime for friendly advice or support on making your China sourcing and importing journey a smooth success.
Contact Information as below:
Email:kevin@china-buying-support.com
Phone | WhatsApp | iMessage:+86 1860 5899 103
Thank you.
Joining Us With 1,200+ Happy Clients Enjoying Buying From China now!
Becoming One of China-Buying-Support family to Get a Easier and Trouble-Free Sourcing and Shipping Service.
